|
| Quest Walkthrough |
| QuestID: 48 |
Add-on: 5/24/2001 2:17:36 PM |
| Goal/Purpose: Recall Scroll, Black Boulder, SOLL Infusions, Aerfelle Staff, Aerfelle Black Robe. |
Difficulty: 9
(1 low/10 high) |
Information:
OVERVIEW
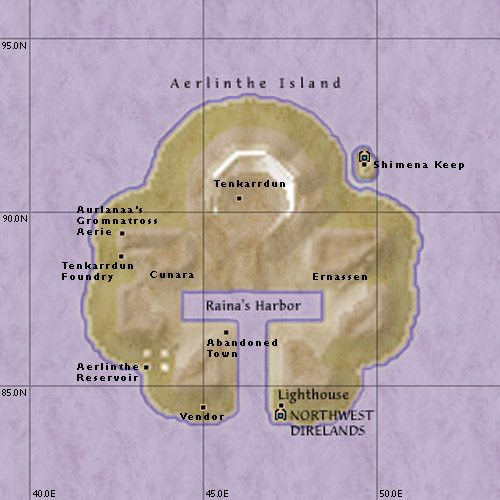
Tenkarrdun Foundry 88.9N, 42.7E
Aerlinthe Reservoir Dungeon 85.5N, 43.4E
caldera of Tenkarrdum (also known as crater) 90.2N, 46.1E
Abandoned Town at 86.4N, 45.6E
Island Drop-Off Point - 84.1N 47.1E
T-Shirt Vendor - 84.3N, 45.0E
Aurlanaa's Gromnatross Aerie - 89.1N, 42.8E
Shimena Keep - 91.4N, 41.7E
STEP1 - get onto the Island
Ok, starting from the very beginning. Two Emissaries from Aerlinthe appear in Dereth. One in Chalicmere Fortress (17.7s 57.4w), and one at a group of temples in South Dires. (87.6s 65.6w).
When you hand the Emissary a C or D note and then summons a portal to the drop point on Aerlinthe (84.1n 47.2e).
--------------------------------------------------------------------------------
Step 2 - Obtain a "Sluice Gate Bar" from Tenkarrdun Foundry dungeon.
The "Sluice Gate Bar" is found in a lower section of the "Tenkarrdum Foundry" dungeon (88.9n 42.7e). I don't have any maps done of the upper part of this dungeon yet, only the lower section. The bar is in the forge room on level 4 that has a number of the same ovens that were at the Crater and a lever. Check the map for details.
--------------------------------------------------------------------------------
Step 3 - Deliver the "Sluice Gate Bar" to the Repair Golem in the second section of the Aerlinthe Reservoir dungeon (85.5n 43.4e).
Now that you have the "Sluice Gate Bar" you need to take it to the Repair Golem NPC in the "Aerlinthe Reservoir Dungeon" (85.5n 43.4e). The Golem is deep in the bowels of the Reservoir. The dungeon is split into 2 parts, the second being 'The Old Ring" section which is where you will find the Golem. Following this partial map to get to the Olthoi Section, then using Nodokas maps of the Olthoi section, you will be able to reach the portal to the "Old Ring" section. The jumps indicated in my top floor Res map lead to the second floor of the Olthoi section, where you see Nodoka has indicated an entrance. You should be able to follow his maps down to the portal at the bottom of the 5th floor of the Olthoi section. In a pit on the 5th floor is a second Aerlinthe Reservoir Portal but it doesn't take you back to the beginning like you would think it does, instead it drops you into the Old Ring section. Using the maps, you should be able to make your way to the jump in the west end of the ring section.. You need to be careful that you jump on an angle that will land you on the safety gate or else you will fall deep into the magma pit and either die from the heat dmg, or get mauled by the golems down there. If you make the jump, you will see the Repair Golem. It looks like a regular magma golem. You hand it the "Sluice Gate Bar" and this message is broadcast to anyone in the area. "The golem turns and fuses the bar into the Sluice Gate. Somewhere below, you hear a grinding vibration through the ground... The fires of Tenkarrdun have been redirected the the ancient Yalaini Forges." . Once this message is broadcast, the golem crumbles to the ground and disappears, thus completing this stage of the quest.
- When you deliver the Sluice Gate Bar to the Repair Golem, that will trigger the Smith Golem to spawn.
--------------------------------------------------------------------------------
Step 0 - Obtain a "Pyreal Bellows" from Crater Caves dungeon at Mt. Esper.
Ok, now onto the next objective. In the note he mentions a bellows. "...Specifically, I need a new set of bellows for the upper forging mechanism, up here in the caldera of Tenkarrdun..." . With this months patch, people found "Pyreal Forge Bellows" up in the Crater Caves dungeon (66.7 N, 12.5 E) , in the bottom room, laying between a few of the oven/forge looking things.
note: do this step prior to going onto the is |
|
|